All posts tagged in Animal Crossing Switch
 Mar 26, 2020
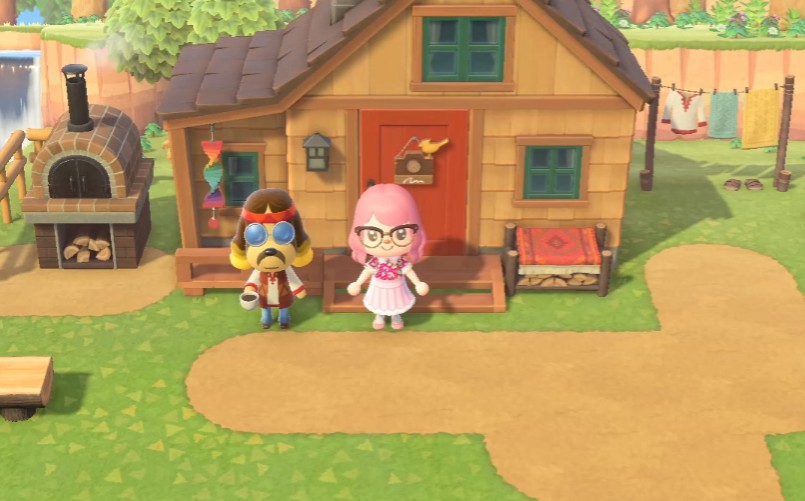
Harvey is an easy-going hippie-ish dog NPC. He first made an appearance in Animal Crossing: New Leaf – Welcome Amiibo, where he was in charge of the campground. Harvey returns in Animal Crossing: New Horizons, where he has his own island which he refers to as Harv’s Island. Here he runs a ‘groovy’ photo studio called Photopia. You won’t be able to access his island straight away though, and will need him to invite you. Here’s how to visit Harv’s Island in Animal Crossing: New Horizons.
How To Get Harvey To Invite You To ‘Harv’s Island’
In order to get to Harv’s Island, you will need him to invite you. And for him to invite you, you will need him to visit your island.
Before he will visit, you will first need to have built Nook’s Cranny, and assisted Tom Nook in preparing three houses for new residents. Nook will require you to build a bridge, choose locations for each of the three houses, and then craft specific interior and exterior items for each house. Once you have submitted and placed all of the required items for each home, residents will start to move in. These residents will be random, unless you have invited characters from other deserted islands before finishing the construction of the homes.

After the third resident moves into one of the homes, Harvey will travel to your island. The free-spirited spaniel will wander around your island, so it may take a little bit of time to locate him. Upon speaking to him, he will compliment the rapid development of your island, which he was expecting to be deserted. He will then suggest that you visit his island.
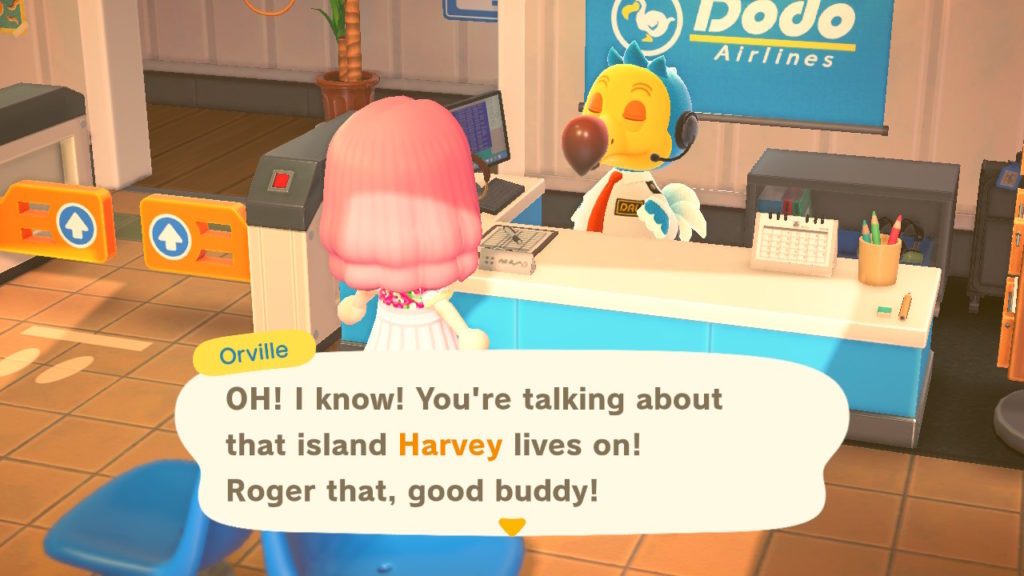
You will then be able to visit his island by heading to the airport. Speak with Orville and select the ‘I wanna fly!’ option. When asked where you’d like to go, choose the ‘Visit Harv’s Island.’ option. Dodo Airlines will then fly you over to Harvey’s Island.
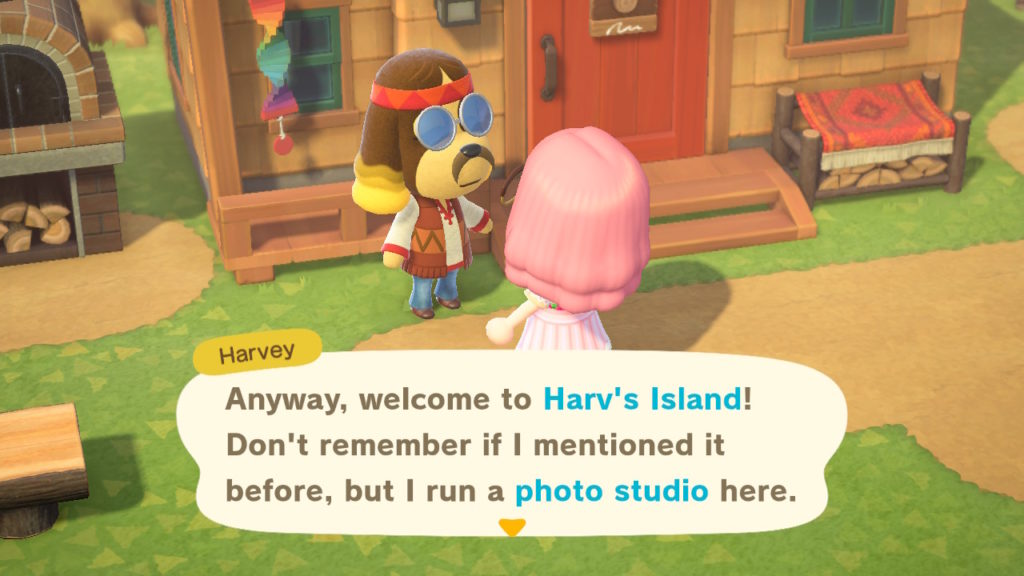
Harvey will be pleased to see you upon your arrival. He will explain his photo studio (which he calls ‘Photopia’) to you and allow you to use it.
What is Photopia?
Photopia (which also doubles as Harvey’s home) is a photo studio with six different sets in six different rooms.

You can decorate these sets using any furniture that you have in your Nook shopping catalogue.
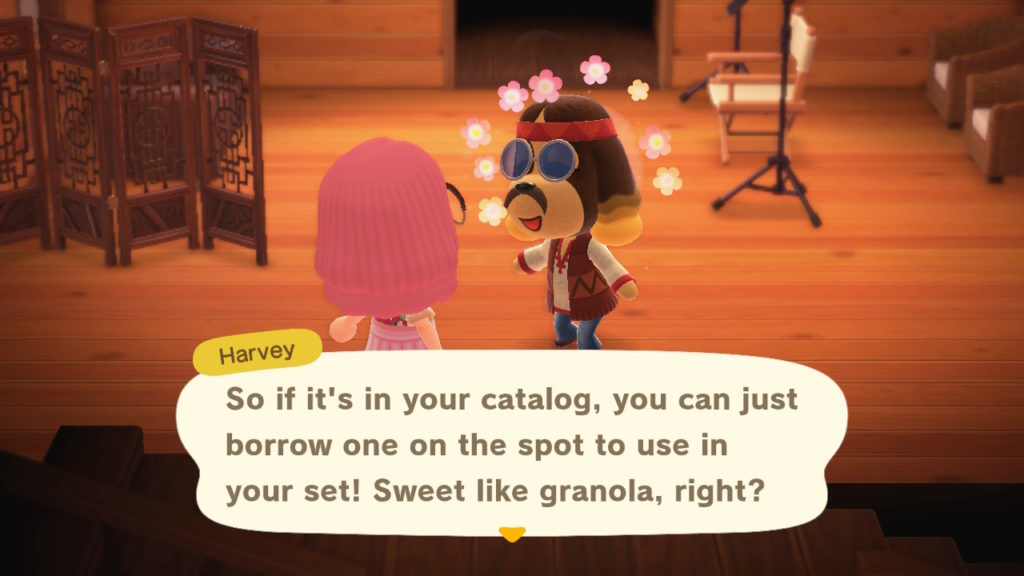
Whilst you can’t take the items back with you, as they are solely props for the photo shoot, you can customize them any way you want to create a perfect set for your models.
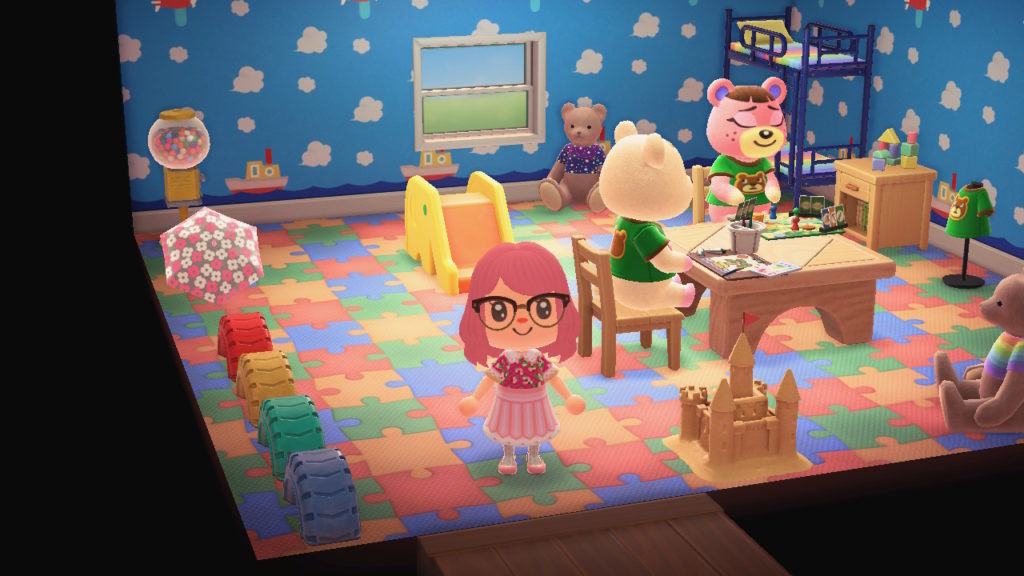
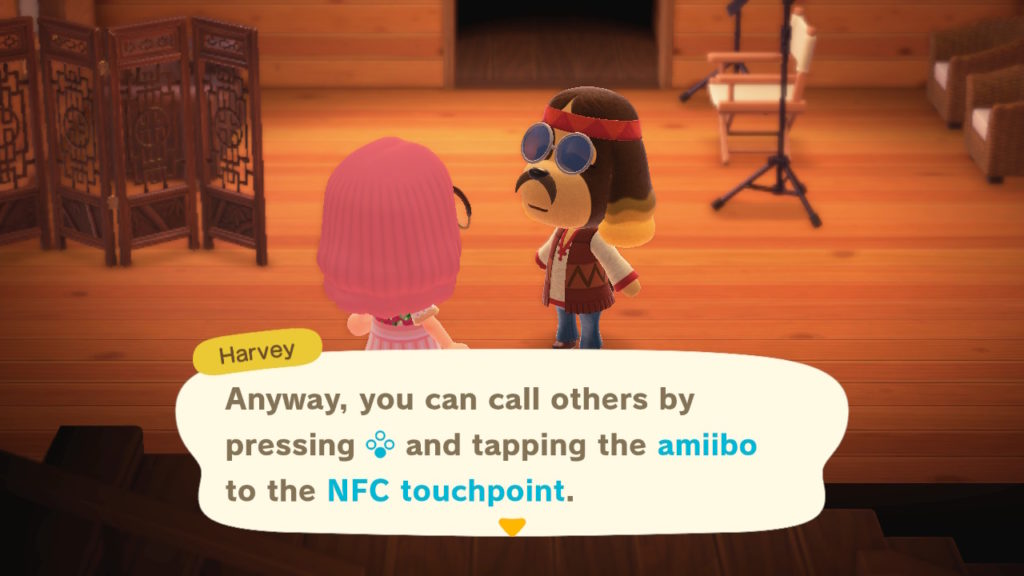
You can have up to ten characters as models in your set. These can be any of the residents that live on your island, or you can use Photopia’s amiibo feature to summon other characters.
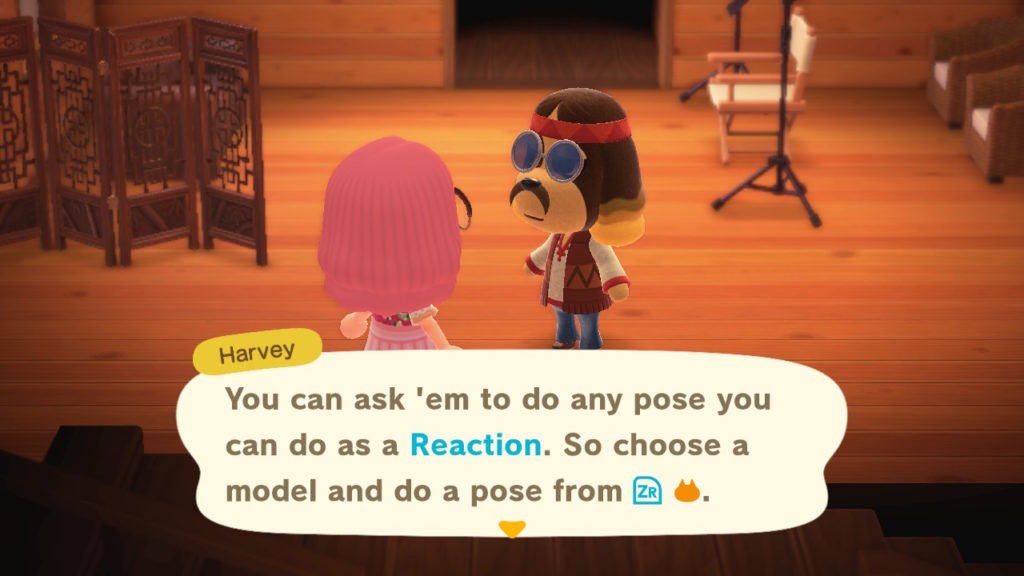
The models will be able to pose using the range of reactions that you have learnt.
Like with furniture, you will be also be able to access a catalogue of clothing. Here, you will be able to dress your models in any of the clothes that you have in the catalogue.

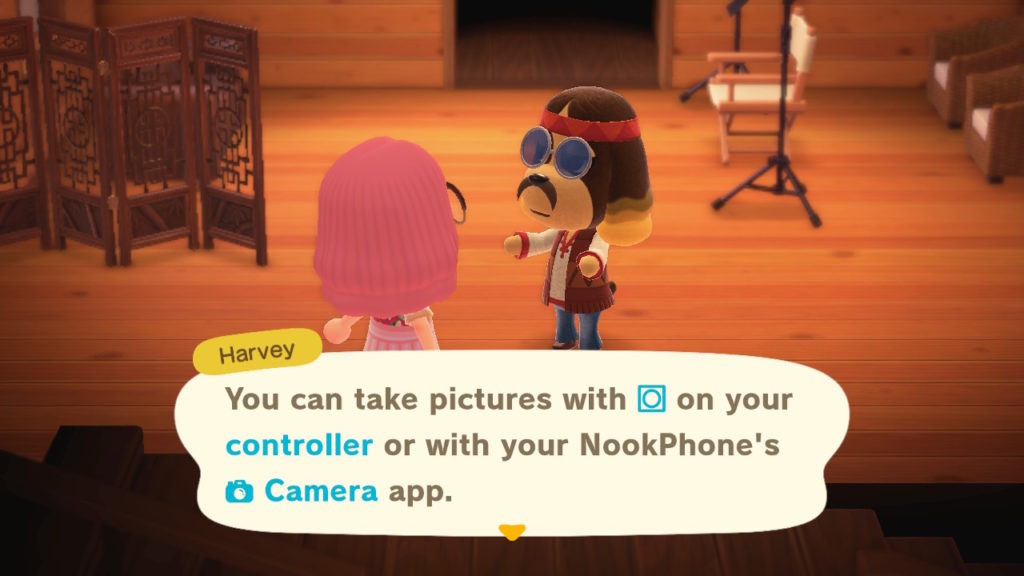
There are two different ways to take photos in Photopia. You can either use the screenshot button on your Nintendo Switch console, or by using the camera on your NookPhone.
If you are unclear about anything, Harvey is more than happy to explain to you how each element of Photopia works.

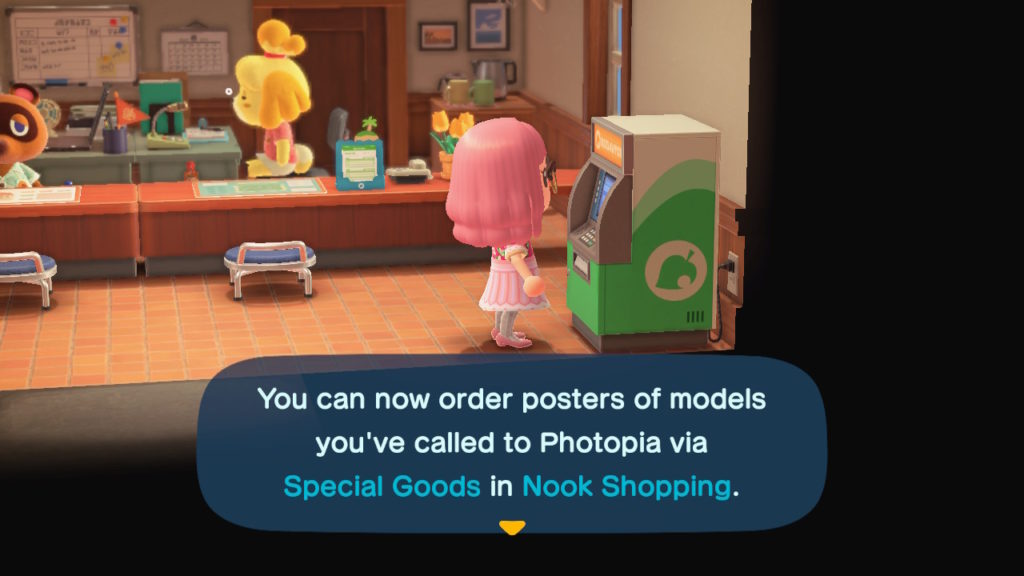
Posters
When you decide to return to your own island, you will receive a call from Harvey. He will explain that he forget to mention something to you. Harvey then elaborates on this and explains that he takes a portrait of every model summoned to Photopia.
He turns these into posters of the character, which can be purchased for 1,000 bells each from the Nook Shopping section of the Nook Stop terminal.
- Mar 26, 2020
Constructing a campsite on your island undoubtedly gives it some extra charm. However, it also serves other purposes. Having a campsite on your island is necessary in order for K.K. Slider to come to your island. The campsite is also a useful way to meet new characters and even invite them to live on your island. Here is a guide on how to unlock the campsite in Animal Crossing: New Horizons.
How To Unlock The Campsite On Your Island
Gameplay is more slow-paced in Animal Crossing: New Horizons than in previous Animal Crossing games. Therefore it takes a bit of time and a few requirements in order to unlock the campsite.
You will first need to have upgraded the Residents Services tent into a building before Tom Nook will suggest the construction of a campsite.
In order to upgrade your Residents Services tent into a building, you will need to do the following:
- Pay off your getaway package debt and upgrade your tent to a house
- Provide the materials required by the Nooklings to build Nook’s Cranny
- Build a bridge
- Craft the required items for three homes and have three new villagers move in
After completing these steps, the Residents Services building will be built. It will take a full calendar day to construct the building, and you will be unable to access the recycling bin or Nook Stop terminal during that day.
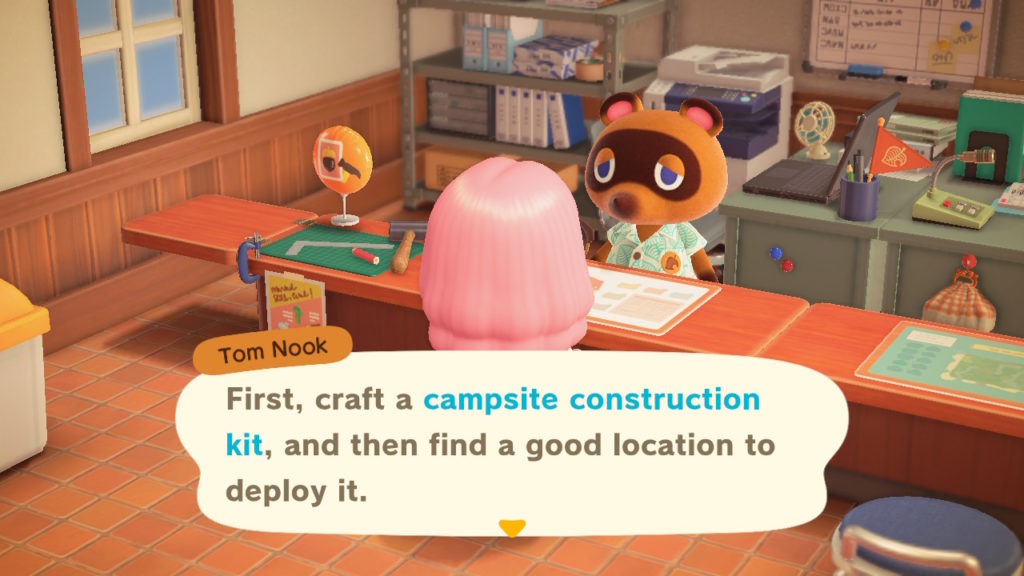
Once you have built the Residents Services building, you need to talk to Tom Nook inside and select the ‘What should I do?’ option twice. He will then explain that he wants K.K. Slider to visit the island and put on a show. However, he wants to build a campsite to attract tourists to the island first. He will then give you a recipe for a campsite construction kit to craft at a workbench.
In order to craft it, you will need 15x iron nuggets, 15x wood, 15x softwood and 15x hardwood.
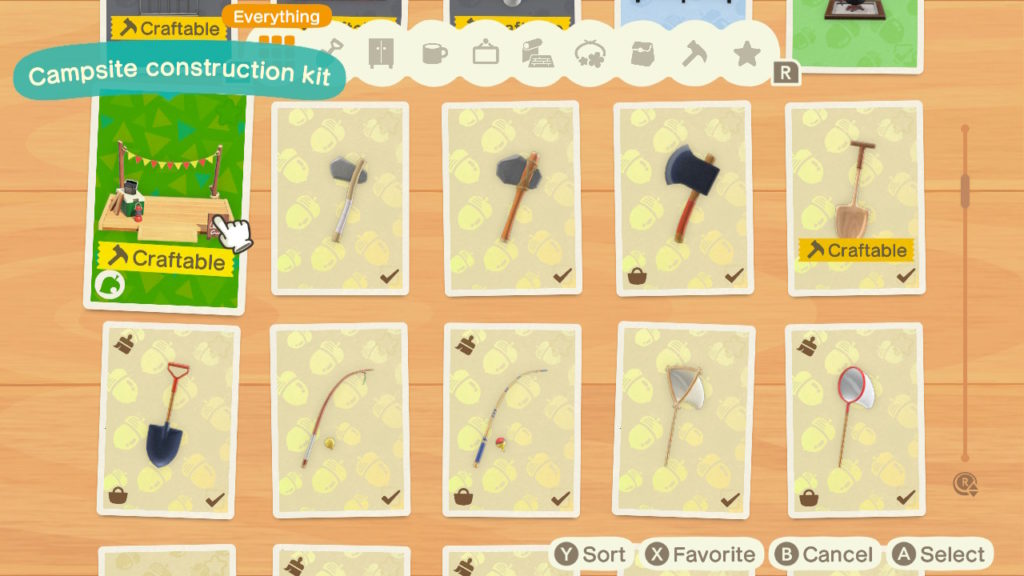
Once you have constructed the kit, you will be able to choose where you want it to be built on your island.
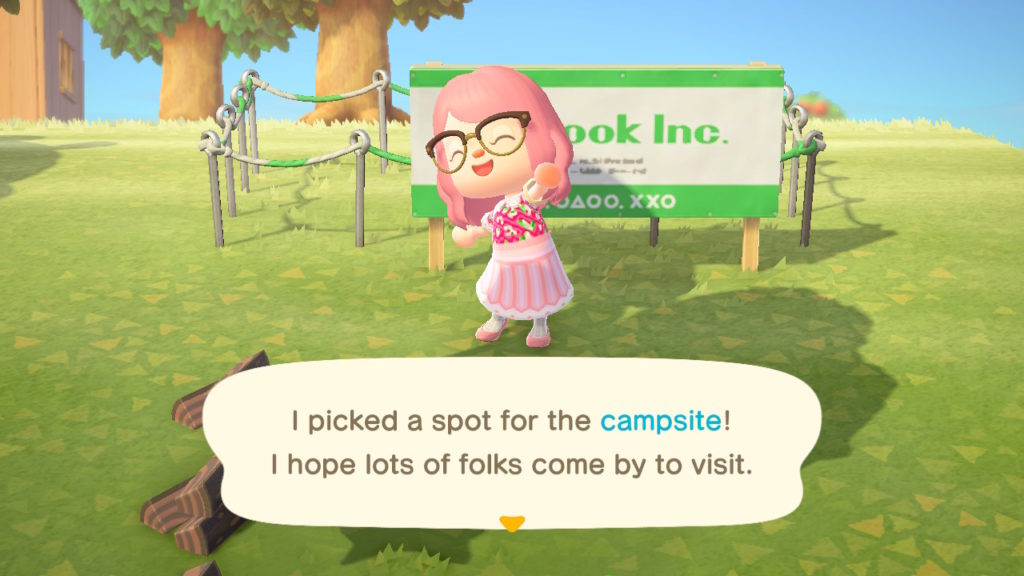
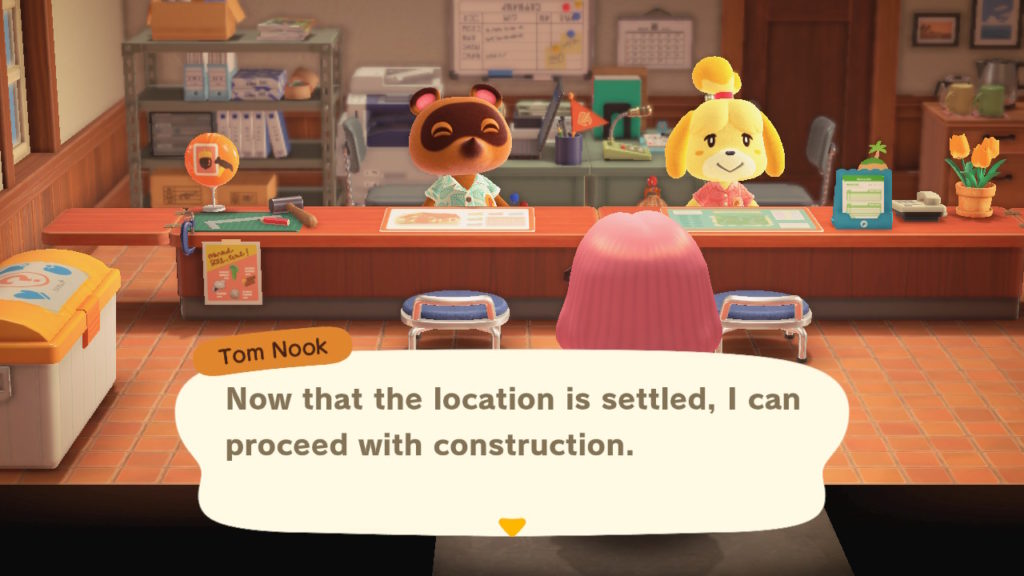
After choosing a spot for the campsite, return to the Residents Services building. Tom Nook will then tell you that he can proceed in constructing the campsite.
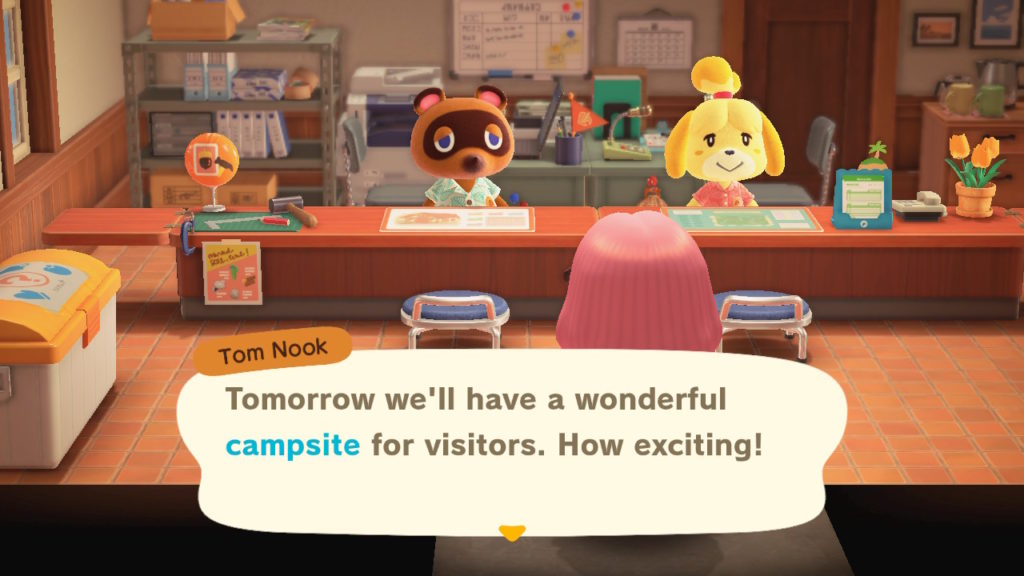
The campsite will be built and ready for visitors the next day.
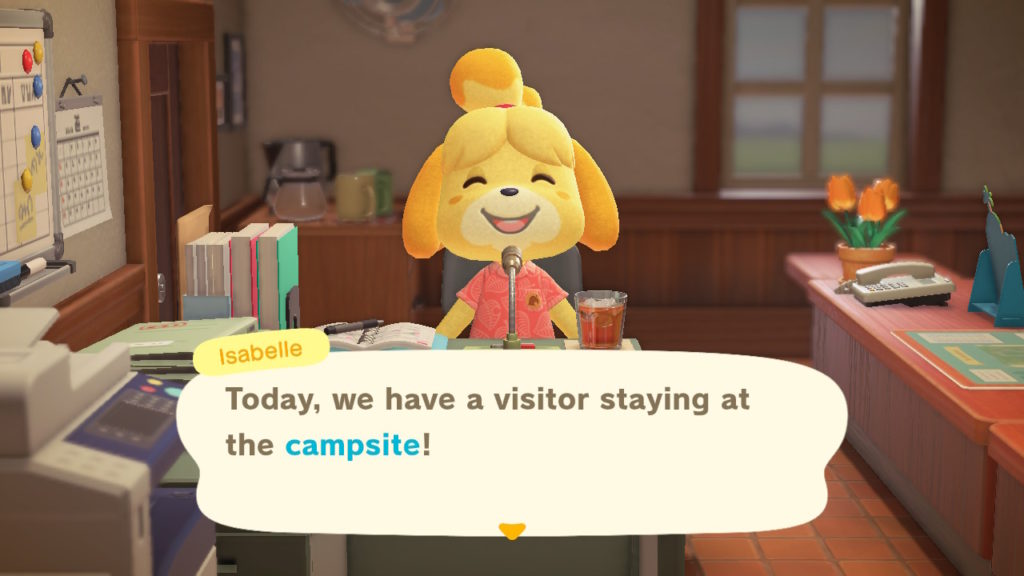
What Purpose Does The Campsite Serve?
Once the campsite is built, there will soon be a tent in its place with a visitor. You can invite any visitors that you want to live on your island by speaking with them and convincing them to move there.
You can also use amiibo cards to invite an animal to your campsite. In order to unlock this feature, you will need to have convinced the first visitor to your campsite to move to your island. Once they have officially moved in, head to Residents Services.
Upon interacting with the Nook Stop terminal, Tom Nook will inform you that he’s added a new service to the terminal. This will allow you to scan in Animal Crossing amiibo cards and invite animals to your campsite. The process is pretty simple. All you need to do is select the ‘invite camper’ option at the terminal, and then when prompted, press your desired amiibo to the NFC reader on your Switch console.

The character will then be summoned to your campsite, where after talking to them several times, you may be able to invite them to your island to stay. Special NPC’s such as Isabelle, Resetti, Mabel, etc, are unable to pay a visit to your campsite. The only other characters you won’t be able to invite are those from the Animal Crossing Sanrio series.
- Mar 25, 2020
New Horizons is the first mainline game to not have the Able Sisters’ clothing shop right from the start. The only clothing you can initially purchase are shorts and some basic t shirts from the Nooklings. You can use the NookLink feature to scan QR codes and wear custom designs. But there are some super cool features in ‘store’ if you manage to get the prickly pair to open a clothing shop on your island. And so here’s how to unlock the Able Sisters shop in Animal Crossing: New Horizons.
How To Get The Able Sisters To Open A Shop On Your Island
In order to unlock the Able Sisters clothing store, you will first need to get Mabel to visit your island. In order to do this, you will need to have upgraded your tent to a house, and built both the museum and Nook’s Cranny, which you can find out how to do here.
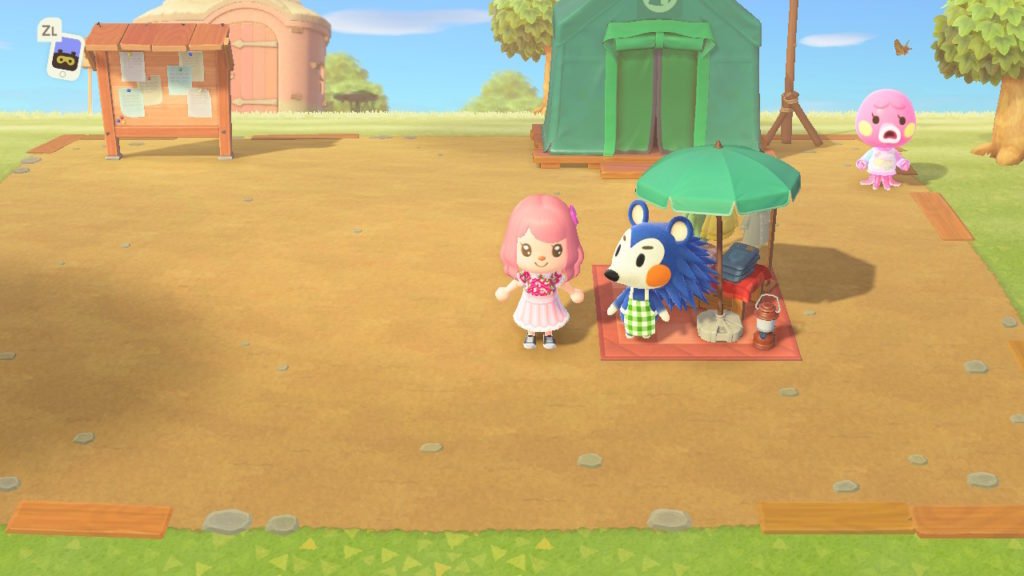
Upon first visiting Nook’s Cranny, you will overhear Mabel talking with the Nooklings. Mabel says that it isn’t all that difficult to get to your island, and that she would like to visit from time to time to sell her wares to island dwellers. She will then show up on your island a few days later.
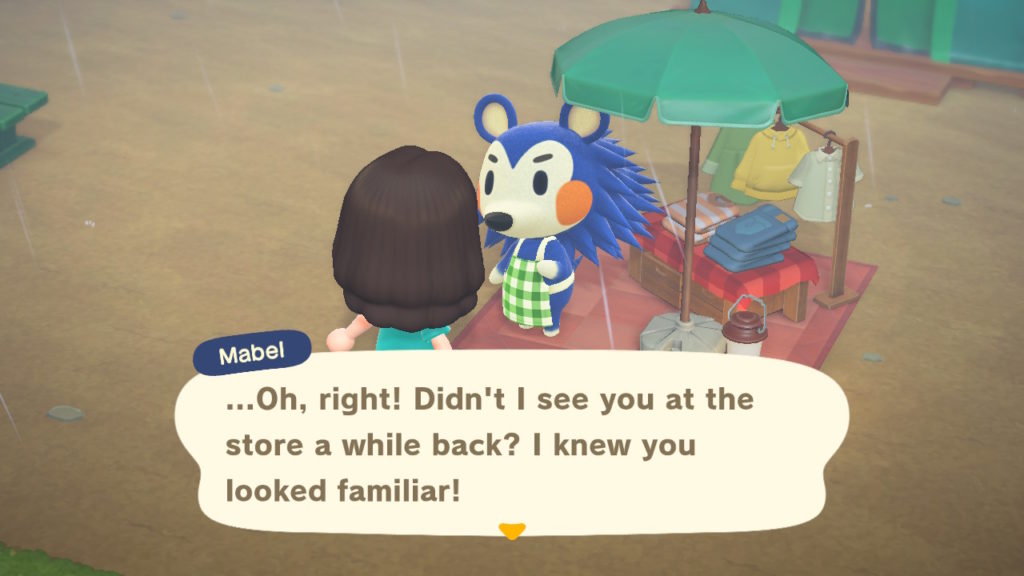
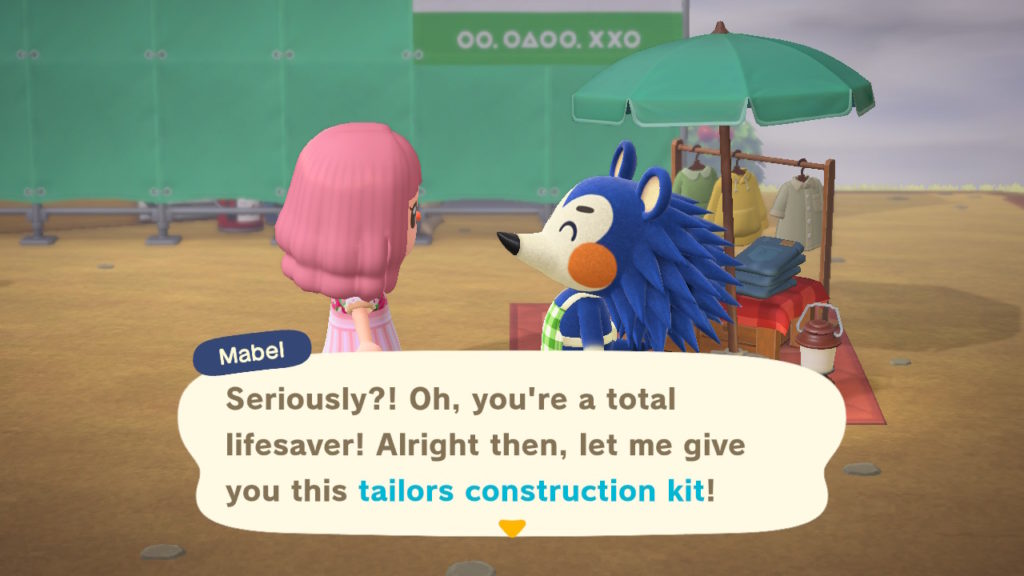
Mabel can be found in the Plaza outside of Residents Services on Saturdays and Sundays, and on a random day of the week. On these days, she will be stood next to a little clothing stall. By speaking to her, you can purchase a small variety of clothing items. Before she decides to build a clothing store, you will need to have purchased 5,000 bells worth of clothing and bought 5 different items over the course of two different visits from her. You will also need to have upgraded the Residents Services tent into a building.
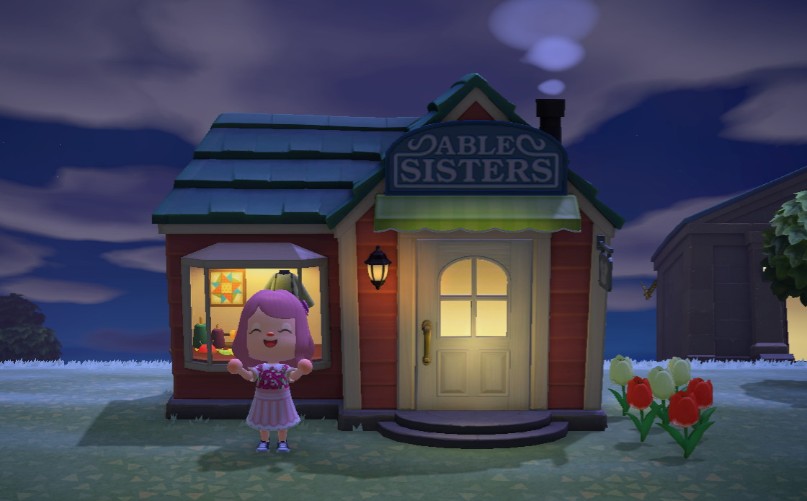
On her third visit to the island, she will tell you that she wants to open up a shop. She will then give you a ‘tailors construction kit’ which allows you to choose where to build the shop. It will take 48 hours for the Able Sisters shop to be built.
Features Of The Able Sisters’ Store In New Horizons
The shop will stock ‘recommended items’ that rotate daily, just like previous mainline games in the series
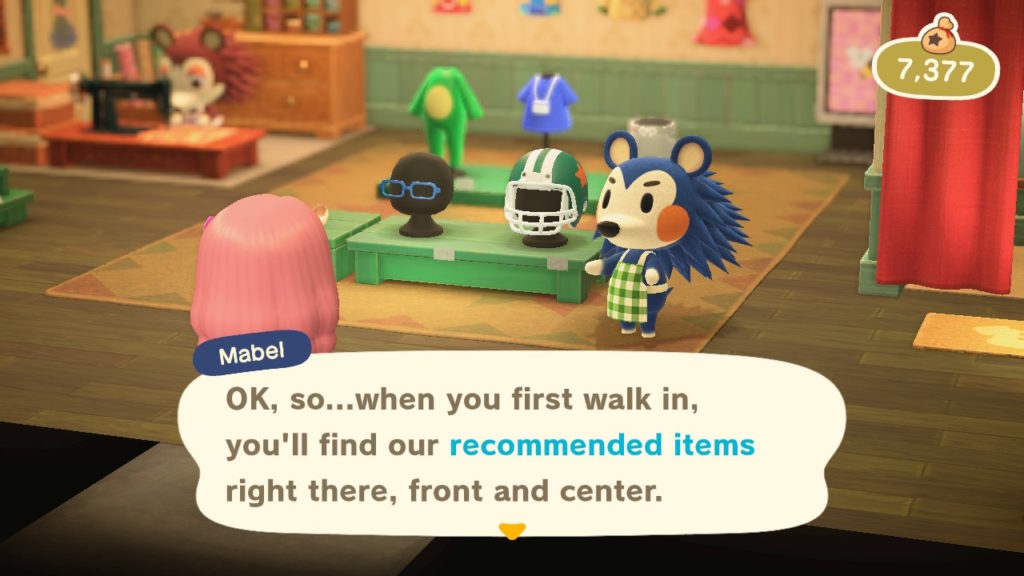
It will also have mannequins that display seasonal outfits. These will change less frequently than the store’s normal wares. However, you can still purchase items that the mannequins are wearing.
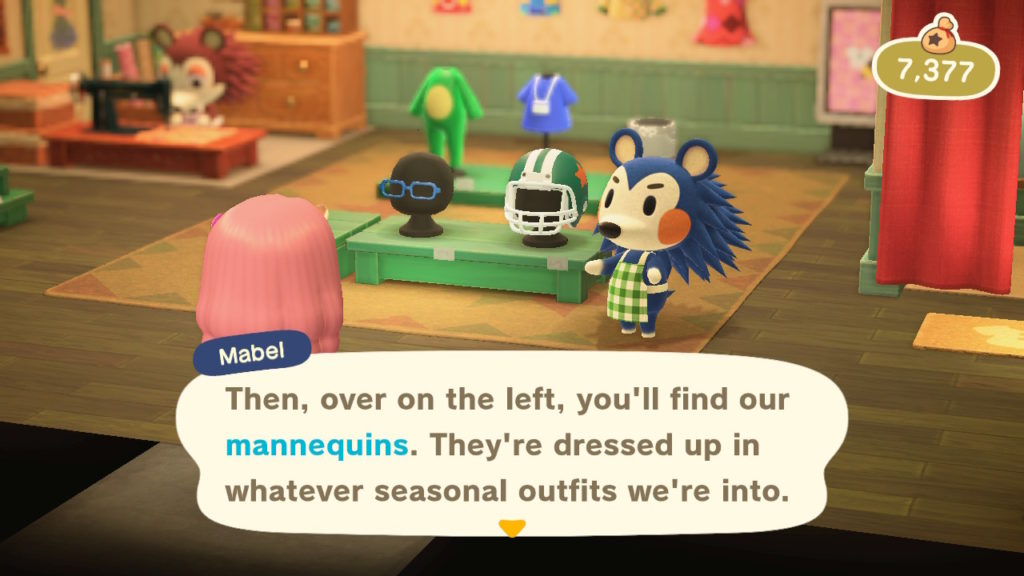
You can display any of your custom designs on the back wall of the store, as well as taking any that are already there.

To the right of the custom designs displayed on the back wall is a ‘Custom Designs Portal’ which you can use to ‘order designs from creators all over the world, and even share your own’.

And finally, the store has its very own fitting room. This is super handy as it shows you the different variations of clothing that are in stock that day.

It also allows you to try on clothes and ‘see how an outfit is coming together’.

Mabel mentions that the fitting room is where they put items that they don’t have space for.

This essentially makes it a catalogue. Another handy thing about the fitting room is that you can buy multiple items at once.
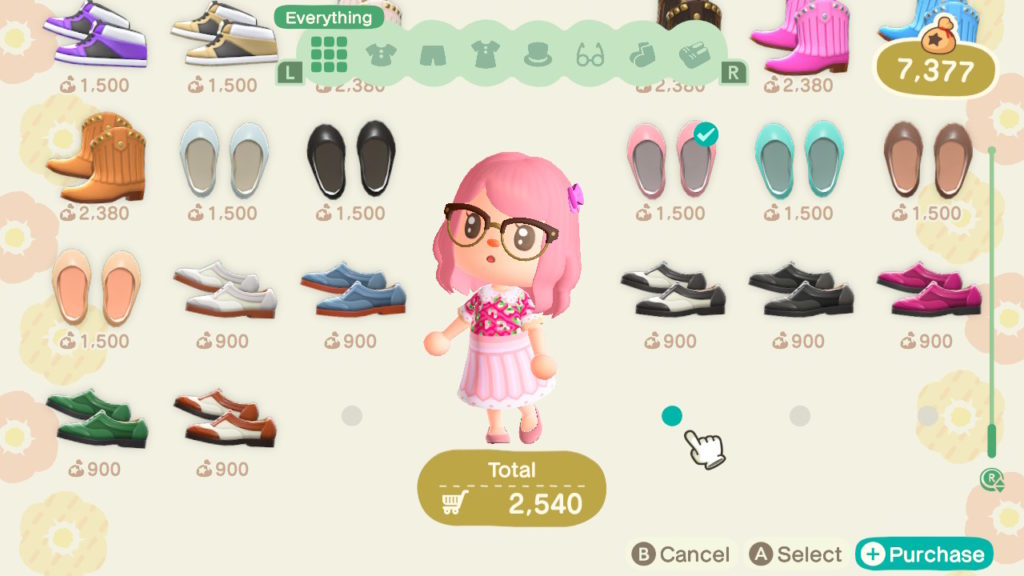
You can also choose to leave the store wearing any purchases, and the clothing you were wearing previously will be sent to your storage at home.
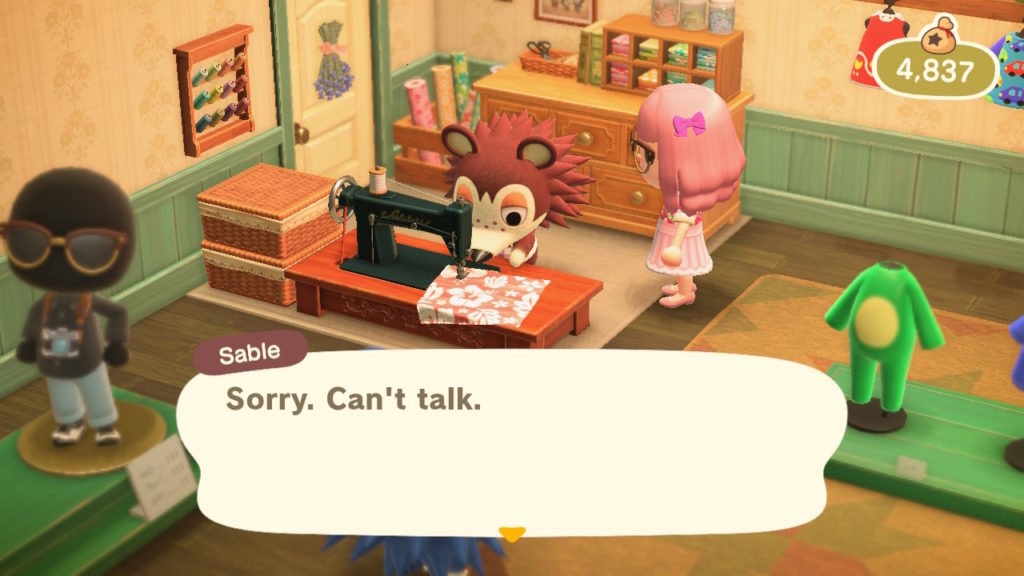
And on a final note, fans of continuity will be pleased to know that Sable is initially as unsociable as ever.
- Mar 25, 2020
Animal Crossing: New Leaf was the first game in the franchise to offer furniture customization. This awesome feature lives on in New Horizons, where clothing customization is also possible. Whilst not available immediately, players will unlock the ability to customize furniture as they progress through the game.
If you wish to jazz up your furniture, but are unsure how, don’t fret, as here’s some guidance on how to customize furniture in Animal Crossing: New Horizons.
How To Unlock Furniture Customization
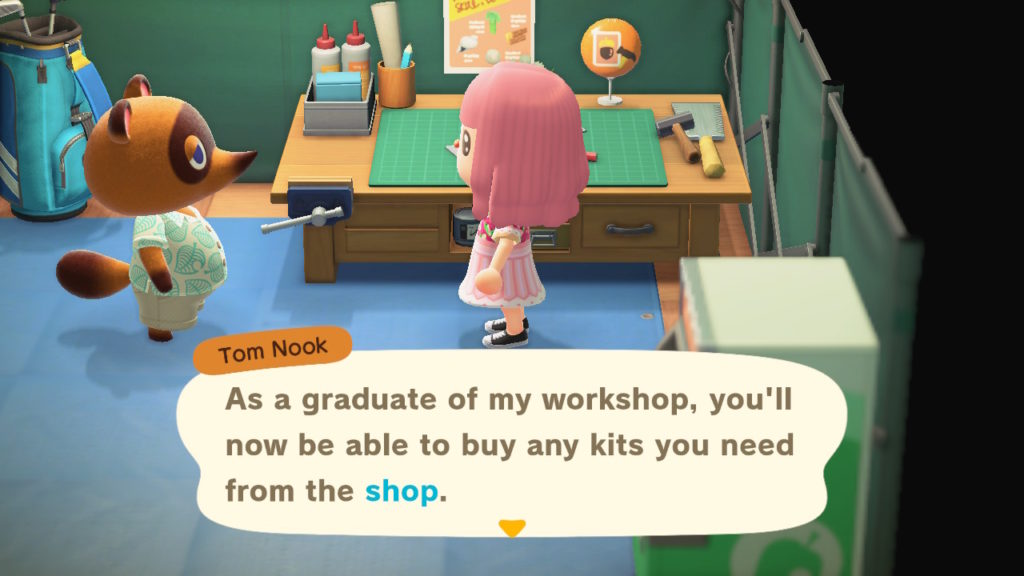
There are a few requirements that players must fulfil before being able to customize furniture. You must complete the museum and invite three new residents to your island, before Tom Nook will invite you to participate in a customization workshop.
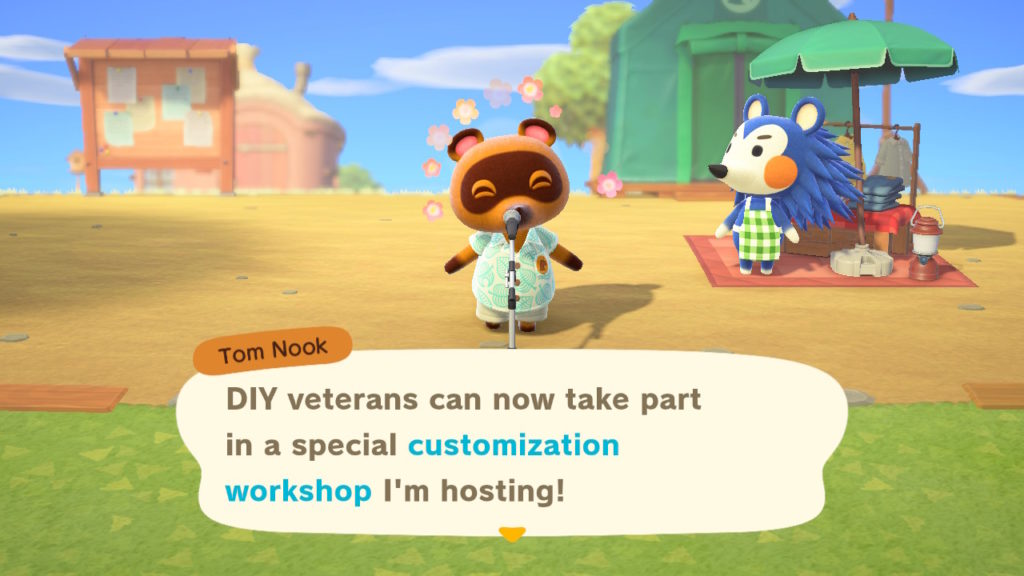
The workshop will take place at Residents Services, where you must craft a wardrobe. Tom Nook will give you the recipe required to craft it. The recipe for it requires 12 pieces of wood. Once you have crafted it, you will then be able to customize furniture.
What Is Required In Order To Customize Furniture
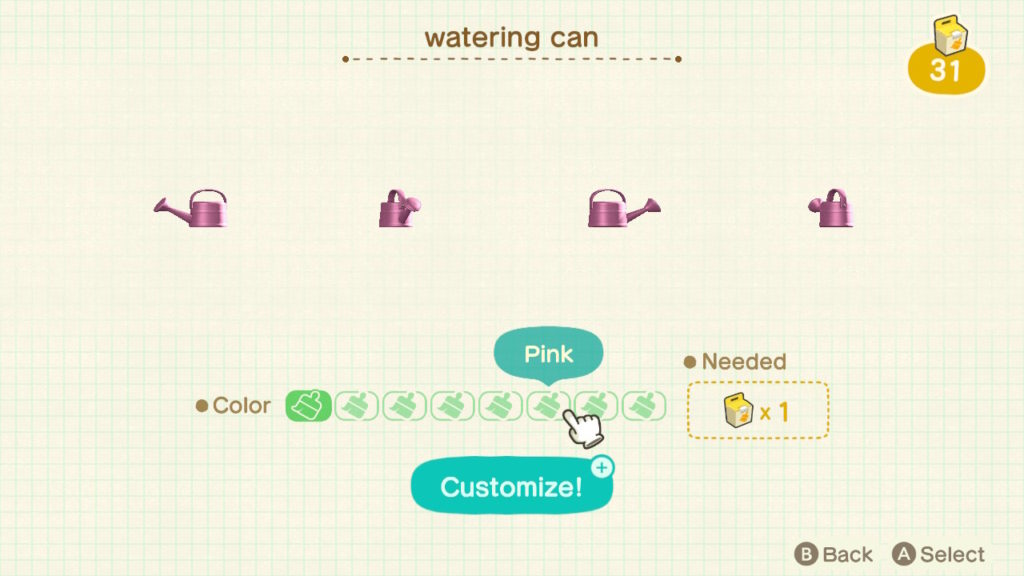
In order to customize furniture, you will need a few customization kits, a piece of furniture that you can customize, and access to a workbench.
You will receive 50 Customization Kits from Tom Nook after completing his customization workshop. If you need any more customization kits, you can buy them from either Nook’s Cranny, or if you have not yet unlocked the store, you can buy them from Timmy in the Residents Services tent instead. They cost 600 bells each to purchase.
How To Customize Furniture
Once you have a piece of furniture that you want to customize, and some customization kits in your inevntory, head to a workbench and interact with it. When asked ‘Should I craft comething?’ select the ‘Customize something option’. You can then select the furniture that you wish to customize, and will be taken to the customization screen. Here, you will be able to change the colour of items.
With some types of furniture, such as beds and tables, you will also be able to change the fabric of the item. There are different coloured fabrics for you to choose from. However, you can also customize fabric using your own designs or designs obtained using QR codes. You can learn more about QR codes in Animal Crossing: New Horizons here.
Fun Fact: You can also customize tools!
- Mar 24, 2020
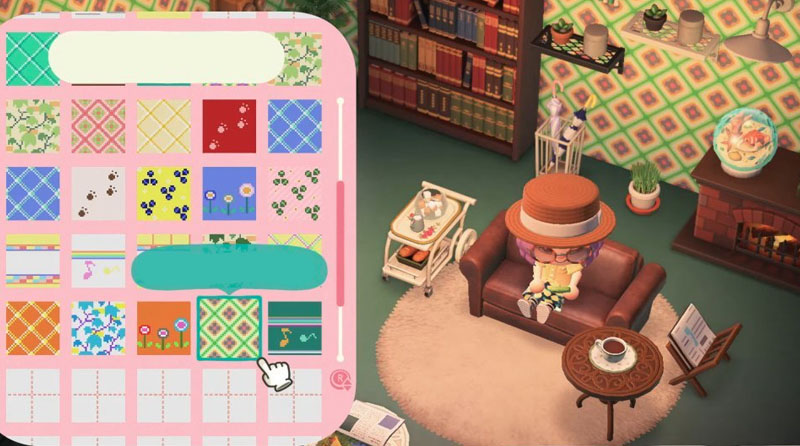
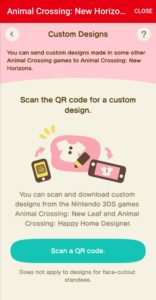
QR codes were first introduced in Animal Crossing: New leaf. Since then, plenty of creative people have created and shared awesome designs in the form of QR codes on the internet. Therefore many Animal Crossing fans will be pleased to know that this feature is also in New Horizons. Here’s how to scan QR codes in Animal Crossing: New Horizons.
What Are QR Codes In The Context Of Animal Crossing?
QR codes are a way of sharing custom clothing, art and tile designs with others. Since the release of Animal Crossing: New Leaf in 2012 in Japan (and in 2013 everywhere else), Animal Crossing fans have been sharing cute, cool and impressive designs on the web. Having been nearly 8 years since the release of New Leaf, there are loads of amazing QR codes for players to use in New Horizons.
How To Scan QR Codes
First of all, make sure to install the Switch Online app on your mobile phone and link your Nintendo account.
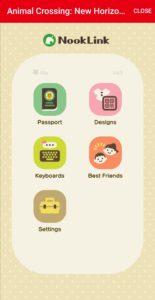
Before you can start scanning QR codes, you will need to establish a NookLink connection between your Switch console and the Nintendo Online app. In order to do this, press the – button on the title screen of New Horizons, which opens the settings.
Tom Nook will appear and give you options to choose from. You’ll want to select the ‘NookLink Settings.’ option and then choose ‘Yes, Please!’ when asked if you’d like to connect to the internet. After this, you will have a NookLink connection between New Horizons and the Switch Online app.
Now, you will be able to begin scanning QR codes via the Switch Online app. To do this, open the app and select Animal Crossing: New Horizons from the ‘Game-Specific Services’ section

This will open the ‘NookLink’ screen, where you should select ‘Designs’
You will then be given the option to scan a QR code
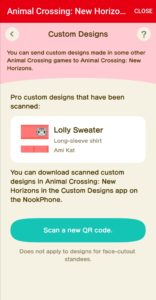
Once you have scanned the QR code of your desired custom design, it can be downloaded in Animal Crossing: New Horizons
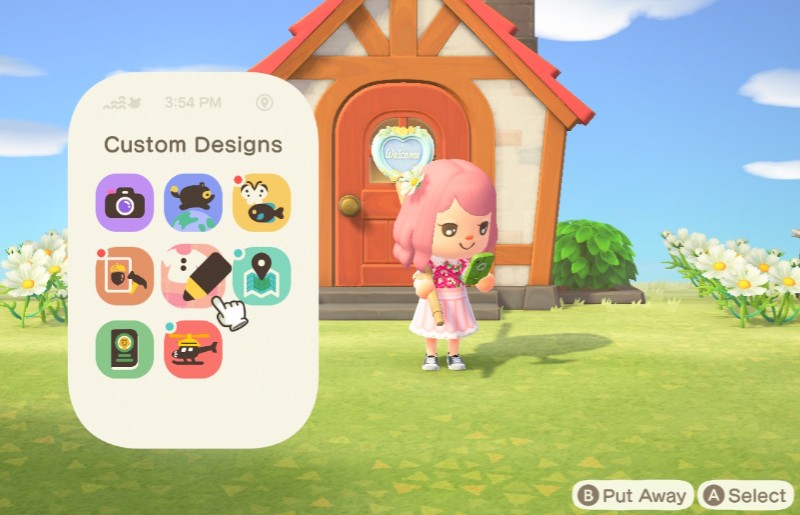
To download it in the game, first, press the ZL button to whip out your NookPhone and select the ‘Custom Designs’ option.
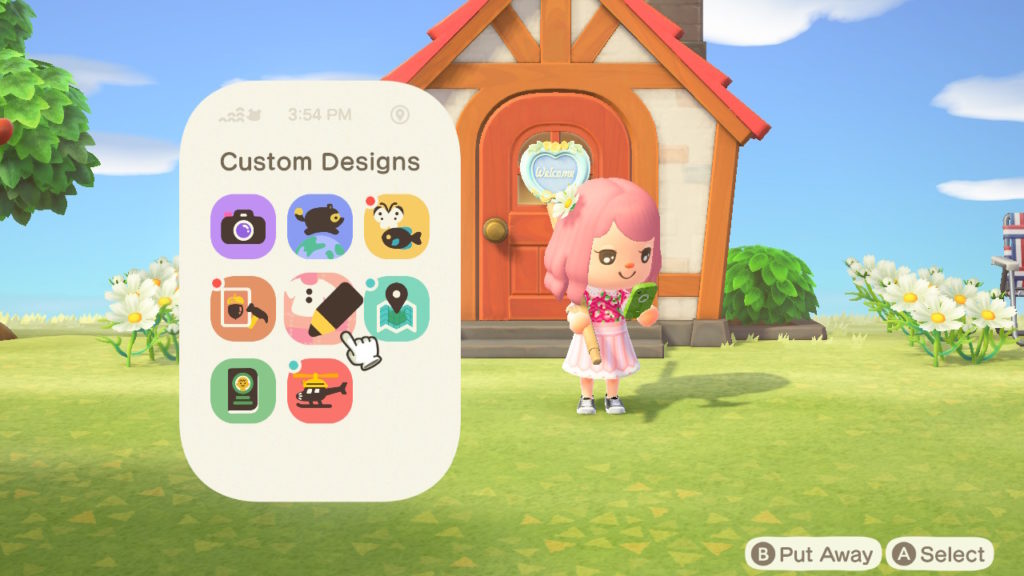
Next, use the R button on your console to where Pro designs are stored. Then move your cursor over a free PRO Pattern slot and press the + button. When asked if you want to connect to the internet and download a custom design made for Nintendo 3DS Games, press download. You will then be told that a PRO custom design was found, and to select a save slot. Press ‘OK!’ to this.
Then, select an empty PRO Pattern slot by pressing A. You will then be asked if you wish to overwite ‘PRO Pattern’. Select ‘Overwrite it’, and the slot will be replaced with your chosen QR code’s design.
To wear your new Pro Design, access the Pro Designs section in the Custom Designs ‘app’ on your NookPhone if you haven’t already. Then simply select your design by hovering over it and pressing the A button and select ‘Wear’.
The ability to use QR codes is a great way for your character to look their very best, even in the early stages of the game.
Below, is a video with 500+ QR codes. As the video is rather fast-paced in order to include that many codes, it may be a good idea to slow down the video’s playback speed.
- Mar 23, 2020
Even the smallest of details and features can make a game considerably better. Before the release of New Horizons, I published two articles (which you can read here, and here) about the amazing attention to detail players could look forward to. Now that the game is here, we can truly appreciate the effort that Nintendo has put into the game.
I’ve covered some of the more obvious elements of the game, but I’ve also noticed some rather neat little things that you might not know. Here are our favourite cool little things that you can do in Animal Crossing: New Horizons.
Hop Over Holes And Small Parts Of Ponds
I don’t know why I found this so exciting. But in Animal Crossing: New Horizons, players can hop over holes and the smaller parts of ponds. To do this, you simply press the joystick in the direction of the hole/small area of water that you wish to hop over. ?️
Sell Weeds And Use Them To Craft Items
Weeds are not as much of a pest as they were in previous games. In fact, you can sell them to the Nooklings (which will also earn you Nook Miles) and use them to craft items such as the Leaf umbrella or Hay bed. ?
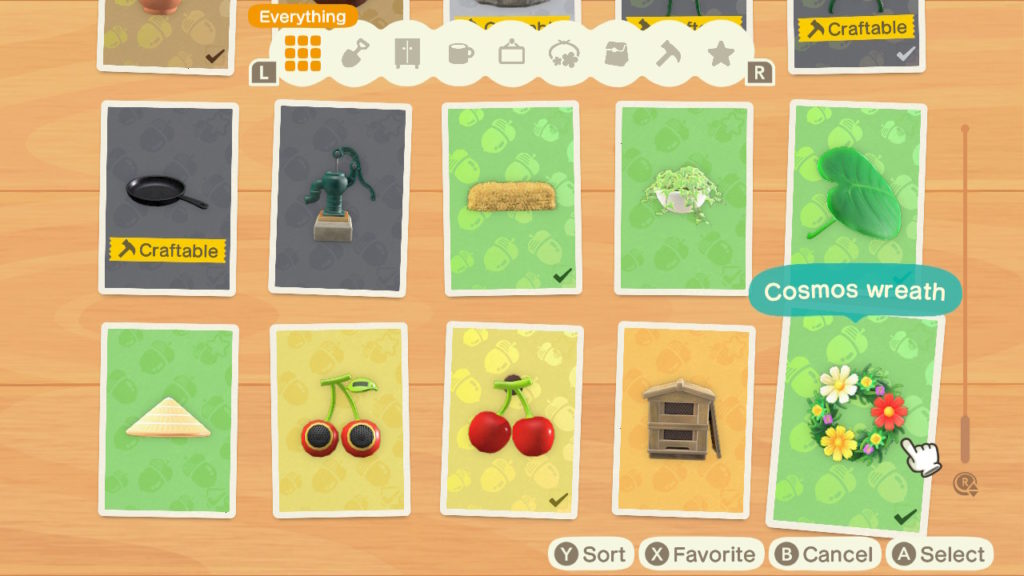
Flower Power
Tom Nook will give you a recipe for a flower wreath after a few days of gameplay, and this only requires 3x yellow, 3x red and 3x white cosmos to craft. ‘Pretty’ neat huh? ?
Are You Tired Of Tires?
In previous games, any tires you reeled in whilst fishing were worthless and considered trash. However, if you ‘catch’ a tire whilst fishing in New Horizons, you will then get the recipe for the ‘Tire toy’ which requires a tire to craft it. ?

Uproot By Eating Fruit
This might not be such a ‘little’ feature, but it is rather cool and impressive nonetheless. By eating a piece of fruit, you can literally dig up an entire tree, store it in your inventory, and relocate it. ?
Let There Be Light
If you catch a fish, you can display it in a tank in your house. However, if you face the fish tank and press the A button, you can turn on a light in the tank. To turn it off, you simply press A again. ?
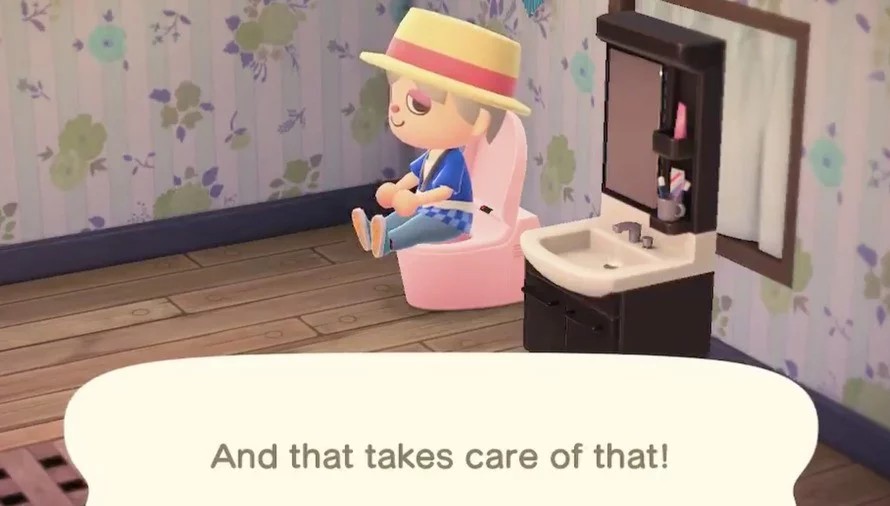
Use A Toilet To Rid Yourself Of Any Fruit You’ve Eaten…
Many internet users initially thought that this was a joke. Nope. If you sit on a toilet after eating fruit, it will get rid of your fruit-powered strength. Simply put, you can essentially poop in New Horizons. ?
Darling Leave A Light On For Me…
If you’ve left a light on inside your house, it will be visible from outside which is pretty cool. However, it’s a good job that Tom Nook doesn’t require you to pay utility bills.. ?
- Mar 23, 2020
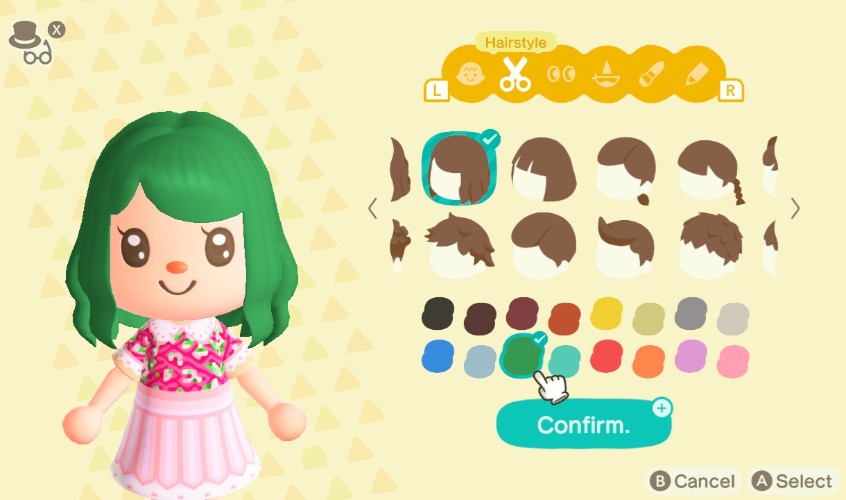
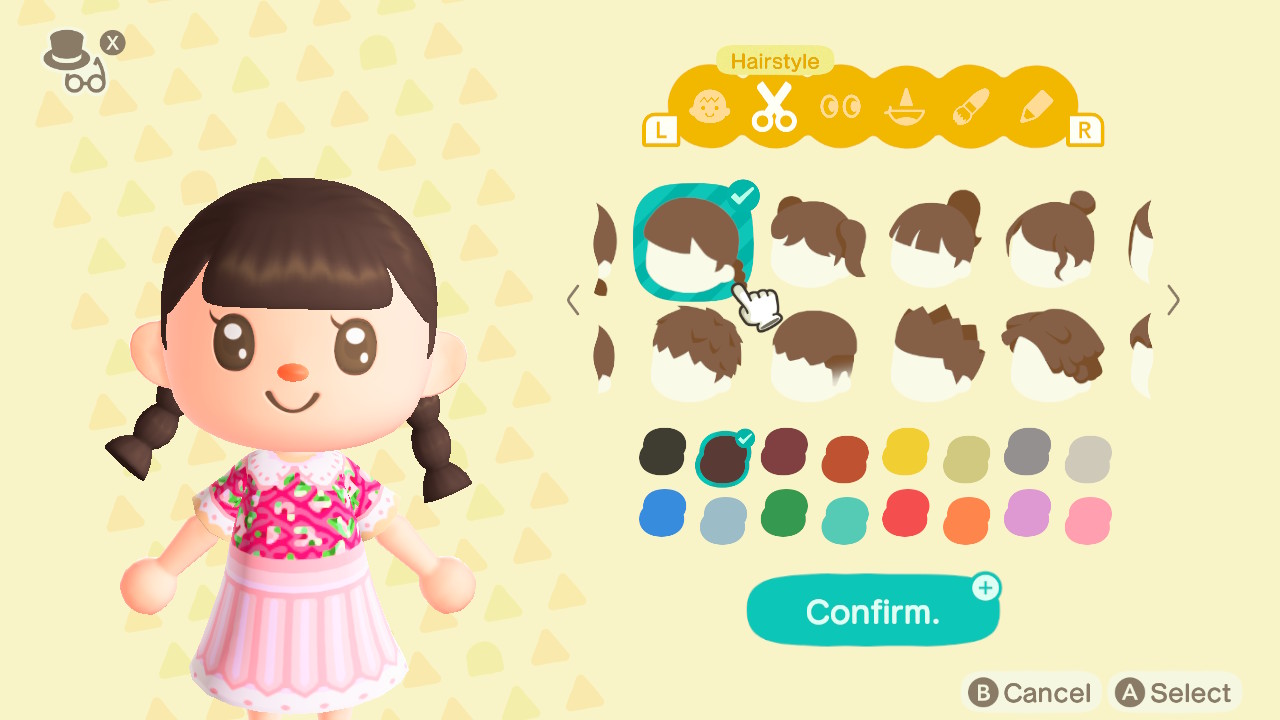
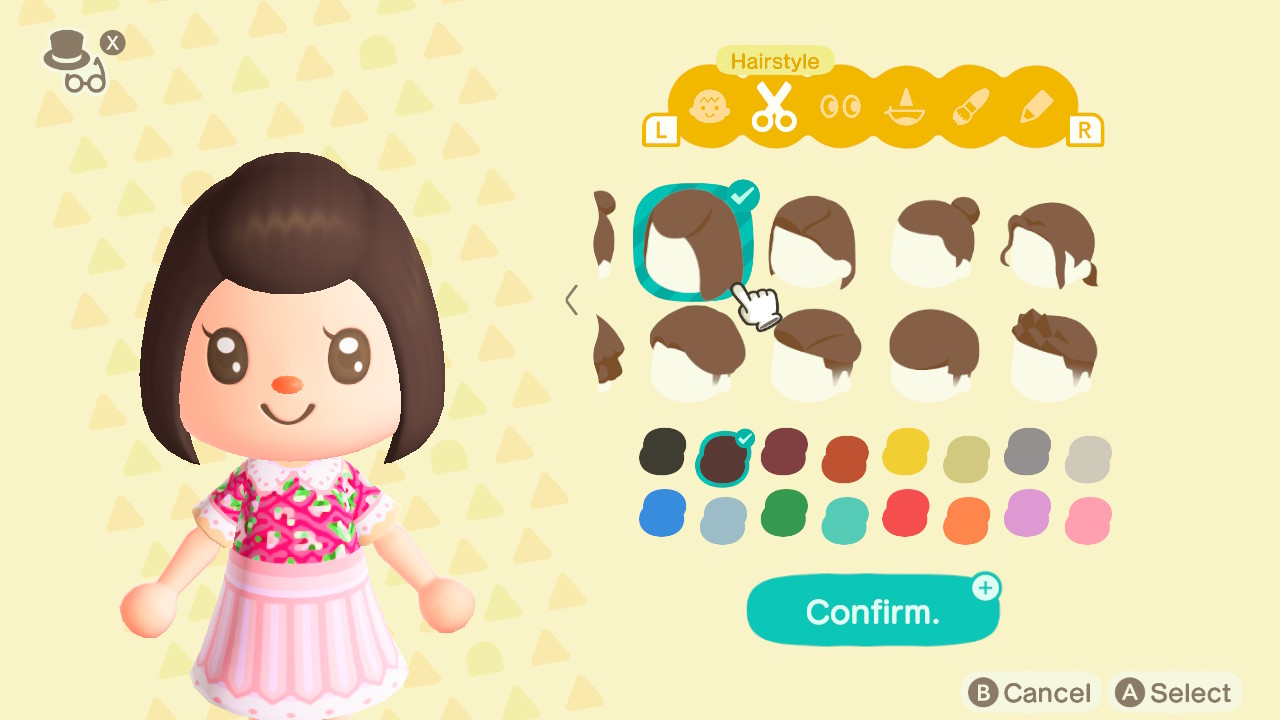
Animal Crossing: New Horizons is the first mainline game in the franchise to allow character customization from the very start of the game. As well as being able to choose from a variety of skin tones and facial features, you can also choose your character’s hairstyle and hair colour. There are 8 different hairstyles and 8 different hair colours to choose from at the start. However, there are more to obtain as you progress through the game. And so here’s how unlock all available hairstyles and colours in Animal Crossing: New Horizons.
The 8 Hairstyles And 8 Hair Colours Available At The Start
How To Change Your Hairstyle Or Hair Colour
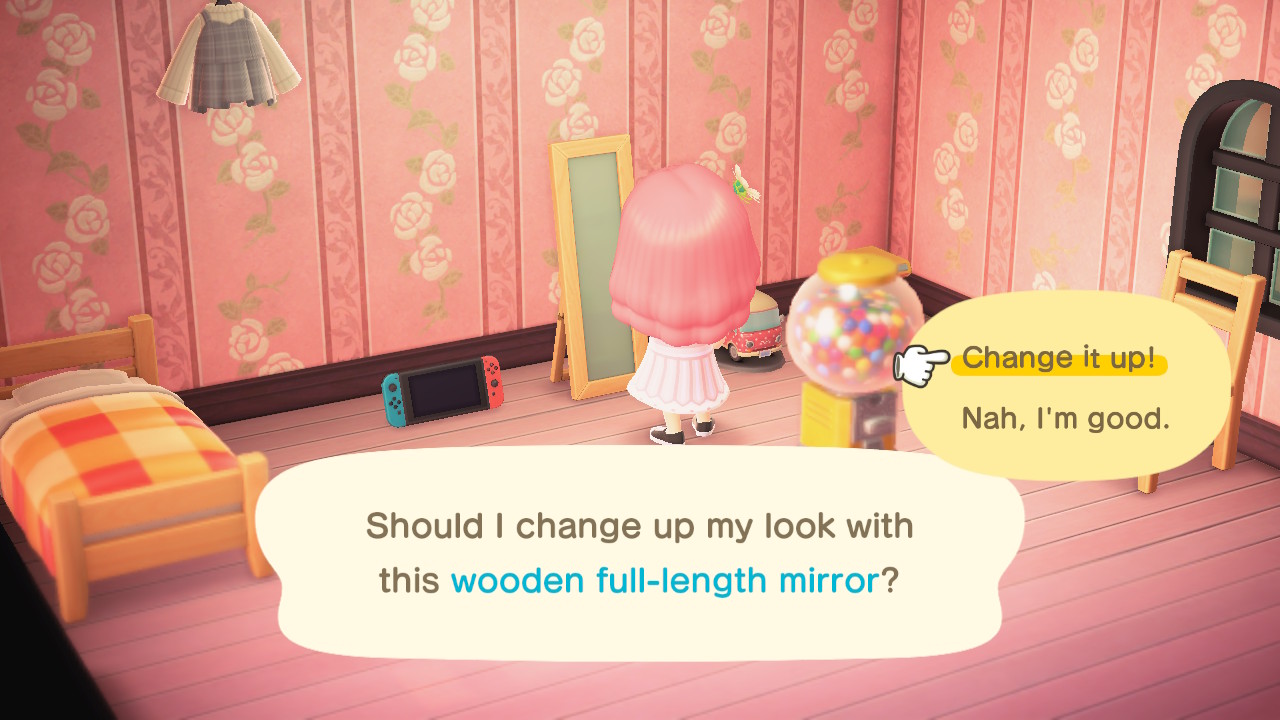
It is entirely possible to alter your character’s hairstyle and/or hair colour if you fancy a change.
In order to do this, you will need a mirror or vanity. You will eventually get the DIY recipe necessary to craft your own mirror. However, you may get lucky and see a mirror or vanity for sale either from Timmy in the Residents Services centre, or from Nook’s Cranny once you have unlocked it.
Once you have crafted or obtained a mirror or vanity, you should interact with it by pressing the A button. You will then be able to change your character’s hairstyle and colour. You will also be able to change your skin tone and facial features.
After interacting with a mirror or vanity for the first time, you will unlock 6 new hairstyles, bringing you up to 14 hairstyles to choose from.
How To Unlock Top 8 Pop Hairstyles
To unlock the ‘Top 8 Pop Hairstyles’, you will need to head to Residents Services and interact with the Nook Stop terminal. You should then select the ‘Redeem Nook Miles’ option, where you will be able to obtain the ‘Top 8 Pop Hairstyles’ for 2,400 Nook Miles. This will bring you up to 22 hairstyles.
How To Unlock Top 8 Cool Hairstyles
To obtain the ‘Top 8 Cool Hairstyles’, you will again need to interact with the Nook Stop terminal and select the ‘Redeem Nook Miles’ option. You will then be able to redeem the ‘Top 8 Cool Hairstyles’ for 2,400 Nook Miles. This will then mean that you have unlocked all of the 30 available hairstyles.
How to unlock Top 8 Stylish Hair Colours
You probably know the drill by now, but to unlock 8 new hair colours, you will again have to visit that tiresome terminal. Interact with it and select the ‘Redeem Nook Miles’ option. You can than purchase the ‘Top 8 Stylish Hair Colours’ for a slightly steeper price of 3,000 Nook Miles.
- Mar 22, 2020
Access The Nook Stop Terminal Every Day
Everytime you access the Nook Stop Terminal, you will be rewarded with Nook Miles simply for checking in for that day. However, the amount of Nook Miles awarded for checking in increases with every consecutive day that you do so. You will receive 50 Nook Miles when you first interact with the terminal. This amount will increase each day, up until day 7 where the amount will be capped to 300 Nook Miles. You will continue to receive 300 Nook Miles from the terminal for every consecutive day you interact with it.
Beware Of Dangerous Creatures
Although you will only be able to access a small part of your island initially, you’d be surprised at the amount of dangerous creatures you may encounter. A lot of DIY recipes in the game require wood. In order to obtain wood, you need to hit trees with an axe. And therefore sooner rather than later you are going to encounter wasps unfortunately. Wasps essentially replace the role of bees in the previous mainline animal crossing games. In previous games, shaking trees ran the risk of disturbing a beehive, which would result in an angry swarm of bees chasing and stinging you unless you could seek shelter in a nearby building. The wasps are just as angry as those bees, and so stocking up on medicine is a very good idea. Medicine can be purchased from Timmy in the Residents Service Tent, or from Nook’s Cranny once you have unlocked it.
Scorpions and tarantulas also roam your island. Thankfully for the arachnophobes amongst us, they only come out at night. If you discover one, my advice is to run for your life, as if they catch sight of you they will chase you and attack. You will then faint and be sent back to your house. They do fetch a pretty penny if you manage to catch one, so if you’re crazy enough to want to do so, here’s some guidance on how to catch a tarantula or scorpion.
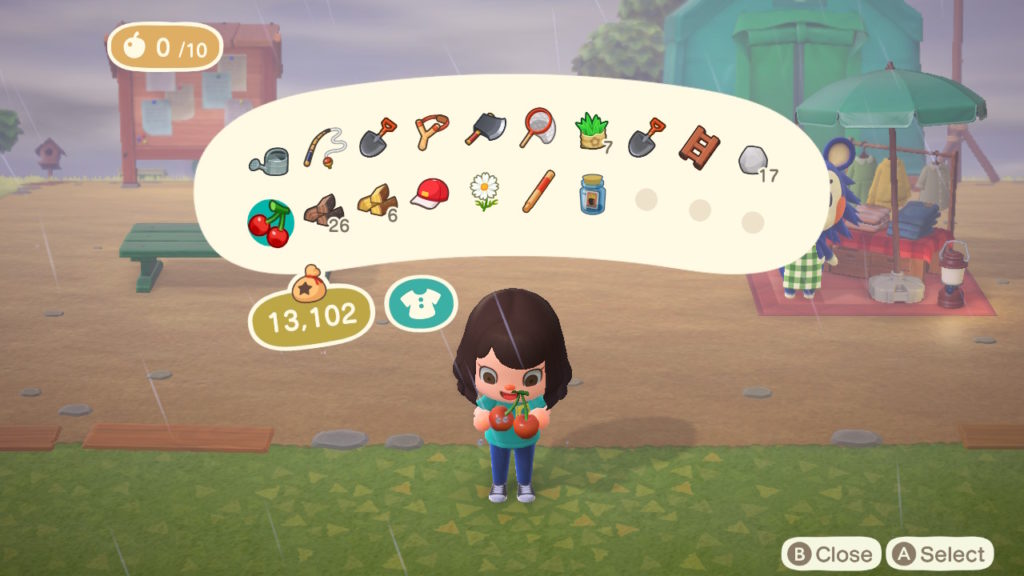
Pocket Organization Guide
Be sure to get the Pocket Organization Guide as soon as possible in order to maximise the number of slots in your inventory. 20 inventory slots might seem like a lot. However, with the crafting element of the game requiring resources, you will soon find yourself needing more slots. You can expand your upgrade to 30 inventory slots by purchasing the Pocket Organization Guide for 5,000 Nook Miles from the Nook Stop terminal at Resident Services. Later on in the game, you will be able to have 40 inventory slots with an upgrade called ‘Ultimate Pocket Stuffing’. This upgrade will cost you 8,000 Nook Miles.

Not All Tools Will Be Craftable Straight Away
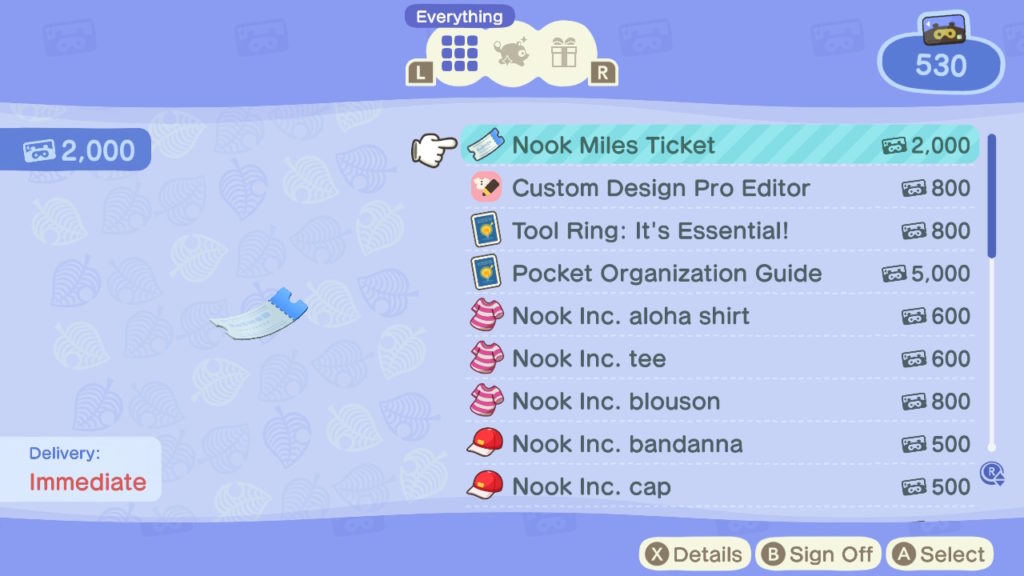
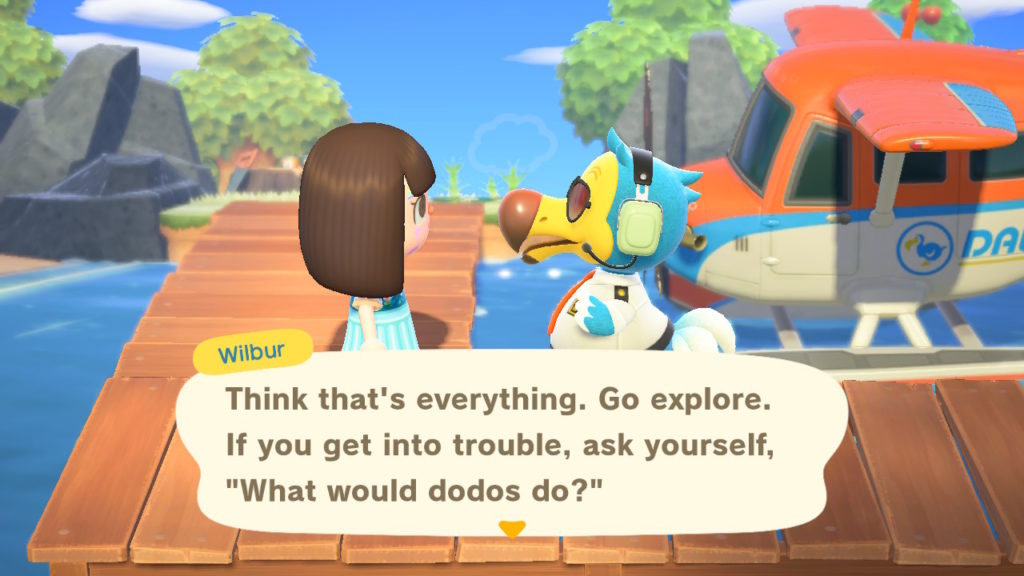
You may be disappointed to find that you can’t craft all of the tools you want straight away. Tom Nook will give you a recipe for a flimsy fishing rod and flimsy net, which can be crafted at the workbench in the Residents Services tent. The slingshot and watering can recipes can be bought from the nooklings, although you may have to wait a few days as the recipes rotate. In theory, you are only able to get the shovel recipe (and vaulting pole recipe) once Blathers visits the island. Once you craft a shovel, you can hit rocks to get the iron nuggets necessary to craft an axe. But to save time, there’s a bit of a loophole to speed things up. If you purchase a Nook Miles Ticket from the Nook Stop terminal for 2,000 Nook miles, you can head to the airport and visit a randomly selected deserted island. Once there, speak with Wilbur and you will be able to purchase any flimsy tool for 100 miles each. You can bring back these tools, as well as anything you find on that deserted island back home with you.
Other perks of using a Nook Miles ticket
As well as being able to buy tools from Wilbur, there are other perks to visiting a deserted island. Before unlocking the vaulting pole and ladder, collecting the iron nuggets necessary for DIY recipes can be frustratingly slow-going. Visiting a deserted island gives you the opportunity to hit more rocks with a shovel and obtain resources. In addition to this, deserted islands may have fruit different to your native fruit and plenty of fauna and critters. You may even encounter a character there who you’d like on your island. After chatting with them a couple of times, you will be able to invite them to your own island.
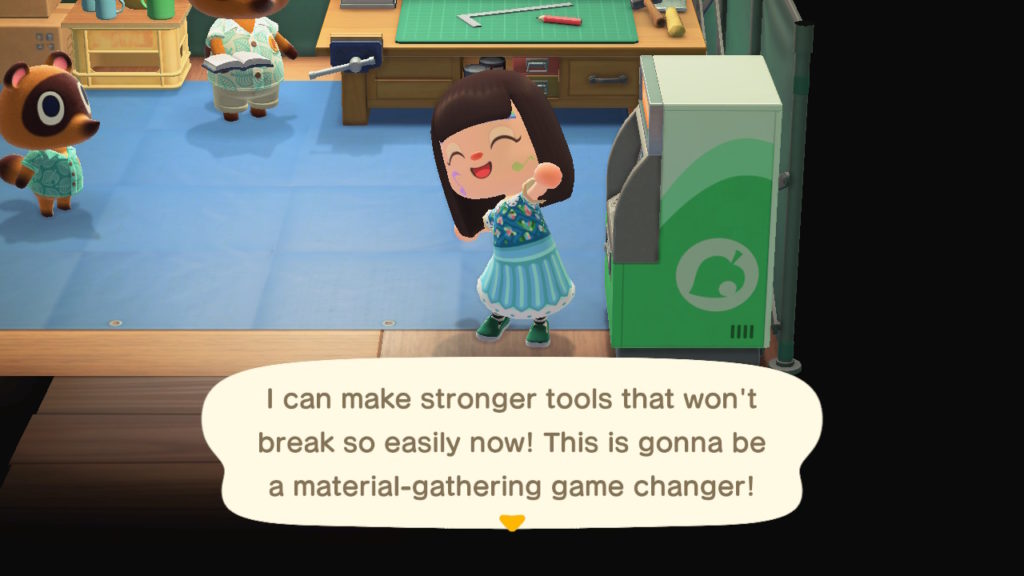
Only Fools Use Flimsy Tools
Once you have acquired a decent amount of iron nuggets, it’s a good idea to purchase the ‘Pretty Good Tools Recipes’ item. This can be obtained from the Nook Stop Terminal for 3,000 Nook Miles. The cost may seem a bit steep, but it’s totally worth the investment. As soon as you purchase it, you can craft stronger tools which last a lot longer than their flimsy predecessors.
Beware How Many Whacks You Give A Tree With Your Axe
The flimsy axe and stone axe are craftable relatively early on in the game. Neither of these two axes are strong enough to fell a tree. Therefore you may wish to upgrade to the simply-named ‘axe’ if you wish to chop down any trees, or find that your flimsier axes are breaking frequently. The ‘axe’ is stronger than its predecessors. Therefore when collecting wood for DIY recipes, be careful not to chop at a tree more than twice, as the third blow will take it down.
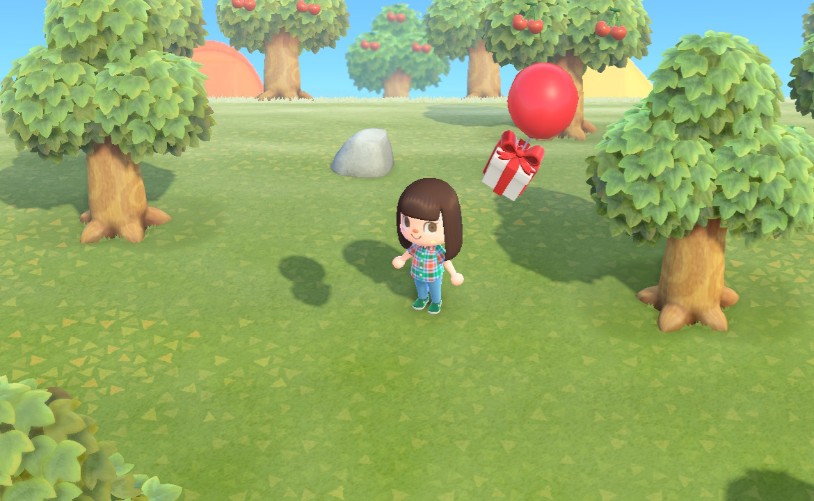
Make Sure You Have A Slingshot
A slingshot can be purchased for 900 bells, or crafted with 5 pieces of hardwood. Once you own a slingshot, make sure to look (and listen) out for floating balloons with presents attached. One way of noticing a nearby balloon is listening for the whooshing sound it makes as it floats by. When equipping your slingshot to shoot the floating present down, make sure that it won’t fall into a river or other body of water. However, there is a Nook Mile reward for just that, which is some consolation. The presents shot down usually contain furniture, which can be sold if it isn’t to your taste.
Eating Too Much Fruit Might Make Things Go Pear-Shaped
Eating just one piece of fruit will give you more strength. Like the sort of strength that allows you to uproot and relocate entire trees. If you hit a rock after eating a piece of fruit, it will obliterate it completely. This is a useful way of getting more resources from a rock. However, you may want to save the rock-smashing for when you visit other deserted islands in order to preserve your own rocks. Whilst eating too much fruit won’t have an unpleasant effect on your player’s digestive system, your extra strength could wreak havoc on your island if you’re not careful. Thankfully, the effects of the fruit will wear off. You will see the fruit counter in the top left of your screen gradually drop over time. Once enough time has passed, it will disappear completely from your screen.
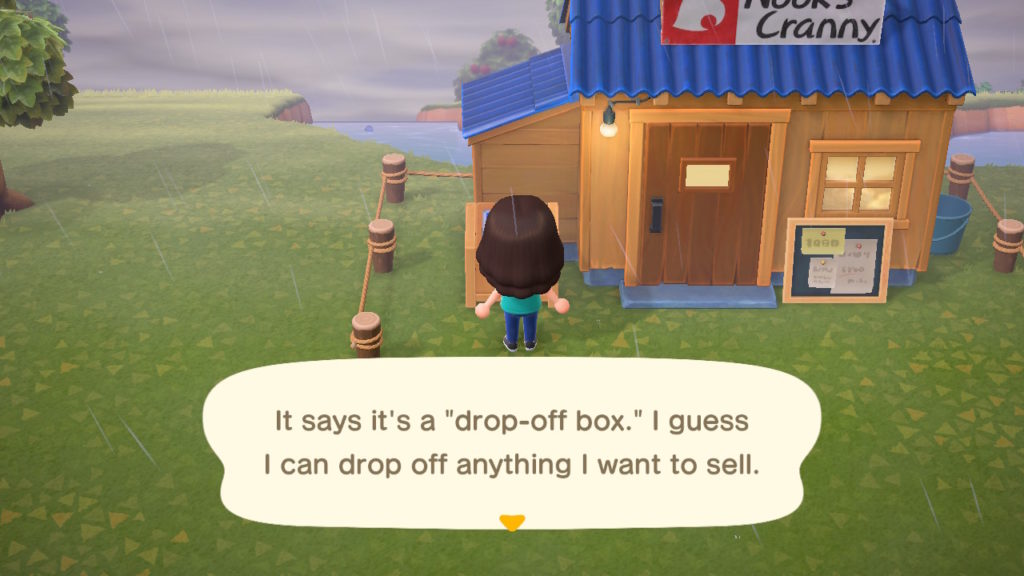
The Nook’s Cranny Drop-Off Box
The drop-off box outside of Nook’s Cranny can be used to sell items when the store is closed. However, there’s a few things that are worth noting. If you do sell items using the drop-off box, you’ll only get 80% of what the Nooklings would pay during opening hours. Additionally, you won’t receive the bells for any items sold until the next day. The funds will be paid into your bank account, which you can access using the Nook Stop Terminal. Turnips cannot be sold using the drop-off box. And finally, you will not be paid double for selling that day’s ‘hot item’ via the drop-off box.